> ## Documentation Index
> Fetch the complete documentation index at: https://docs.layercode.com/llms.txt
> Use this file to discover all available pages before exploring further.
# Connect Your Backend
> How to connect your own agent backend to a Layercode agent.
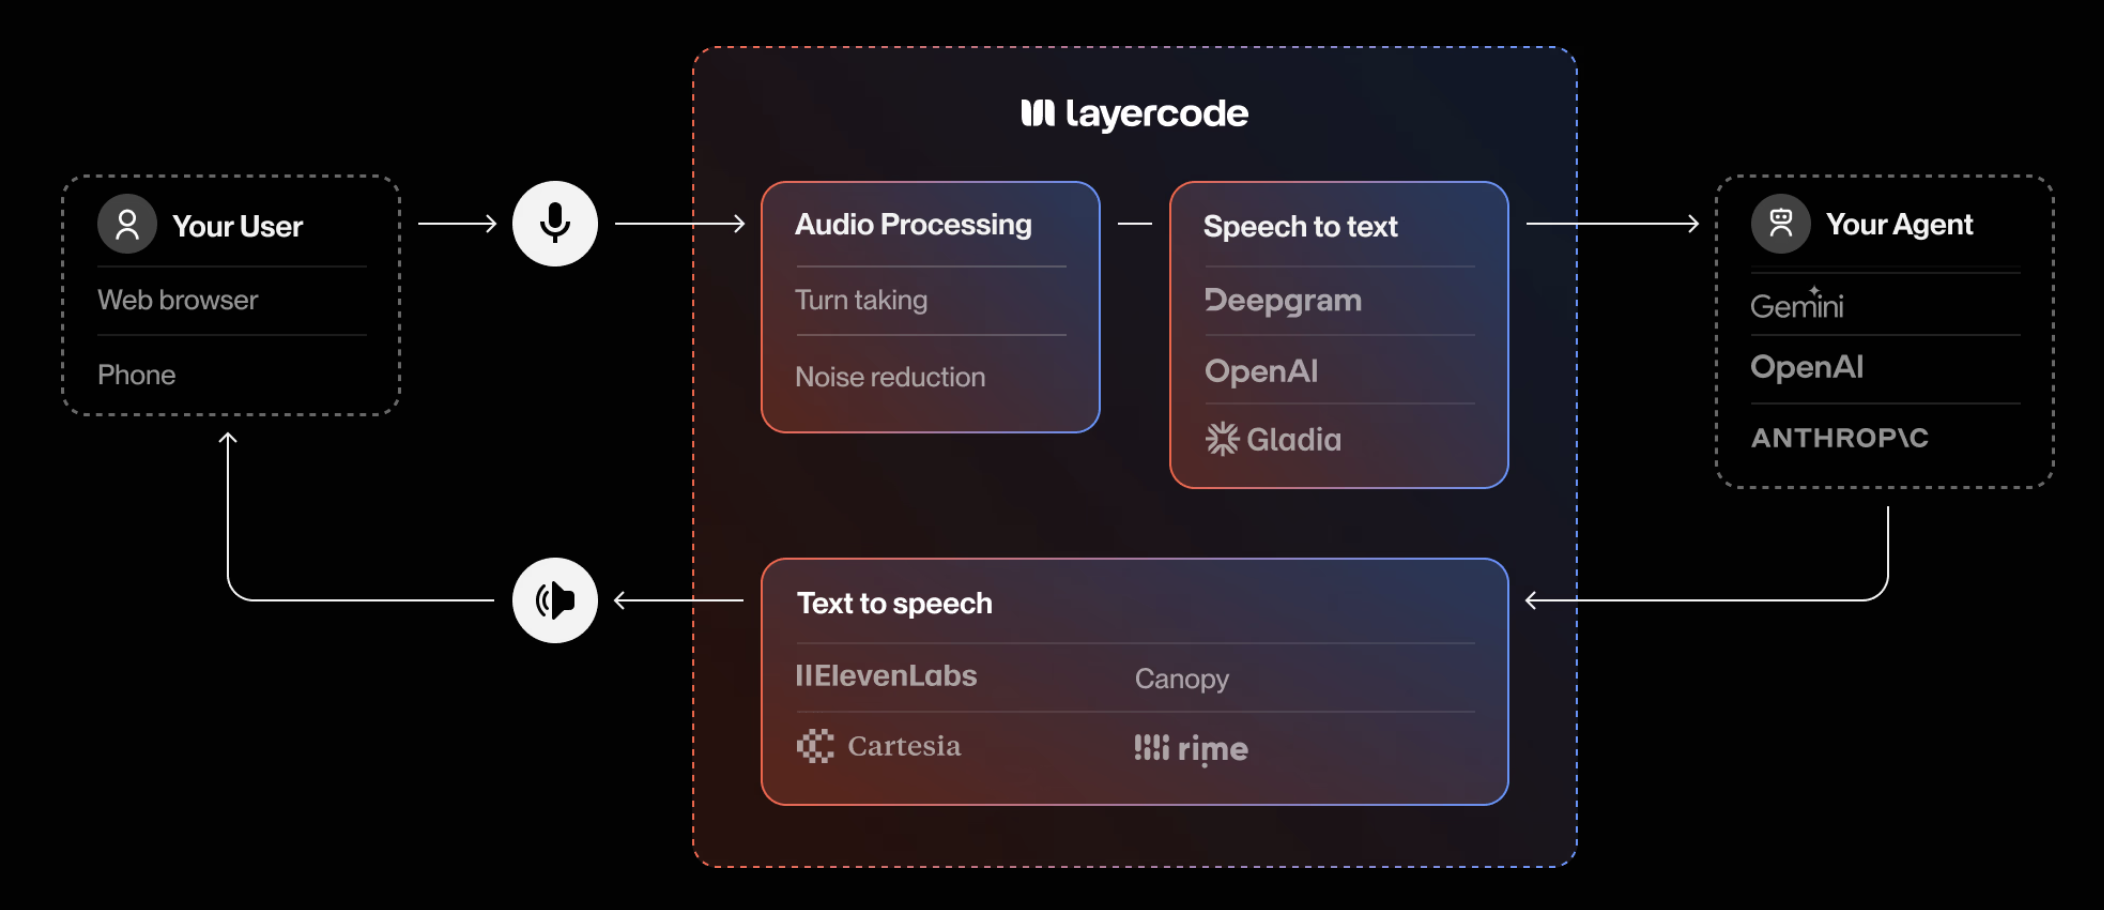
Layercode is designed for maximum flexibility: you can connect any backend that can receive an HTTP request and return a Server-Sent Events (SSE) stream.
This allows you to use your own LLM-powered agent, business logic, or orchestration—while Layercode handles all the real-time voice infrastructure.
## How it works
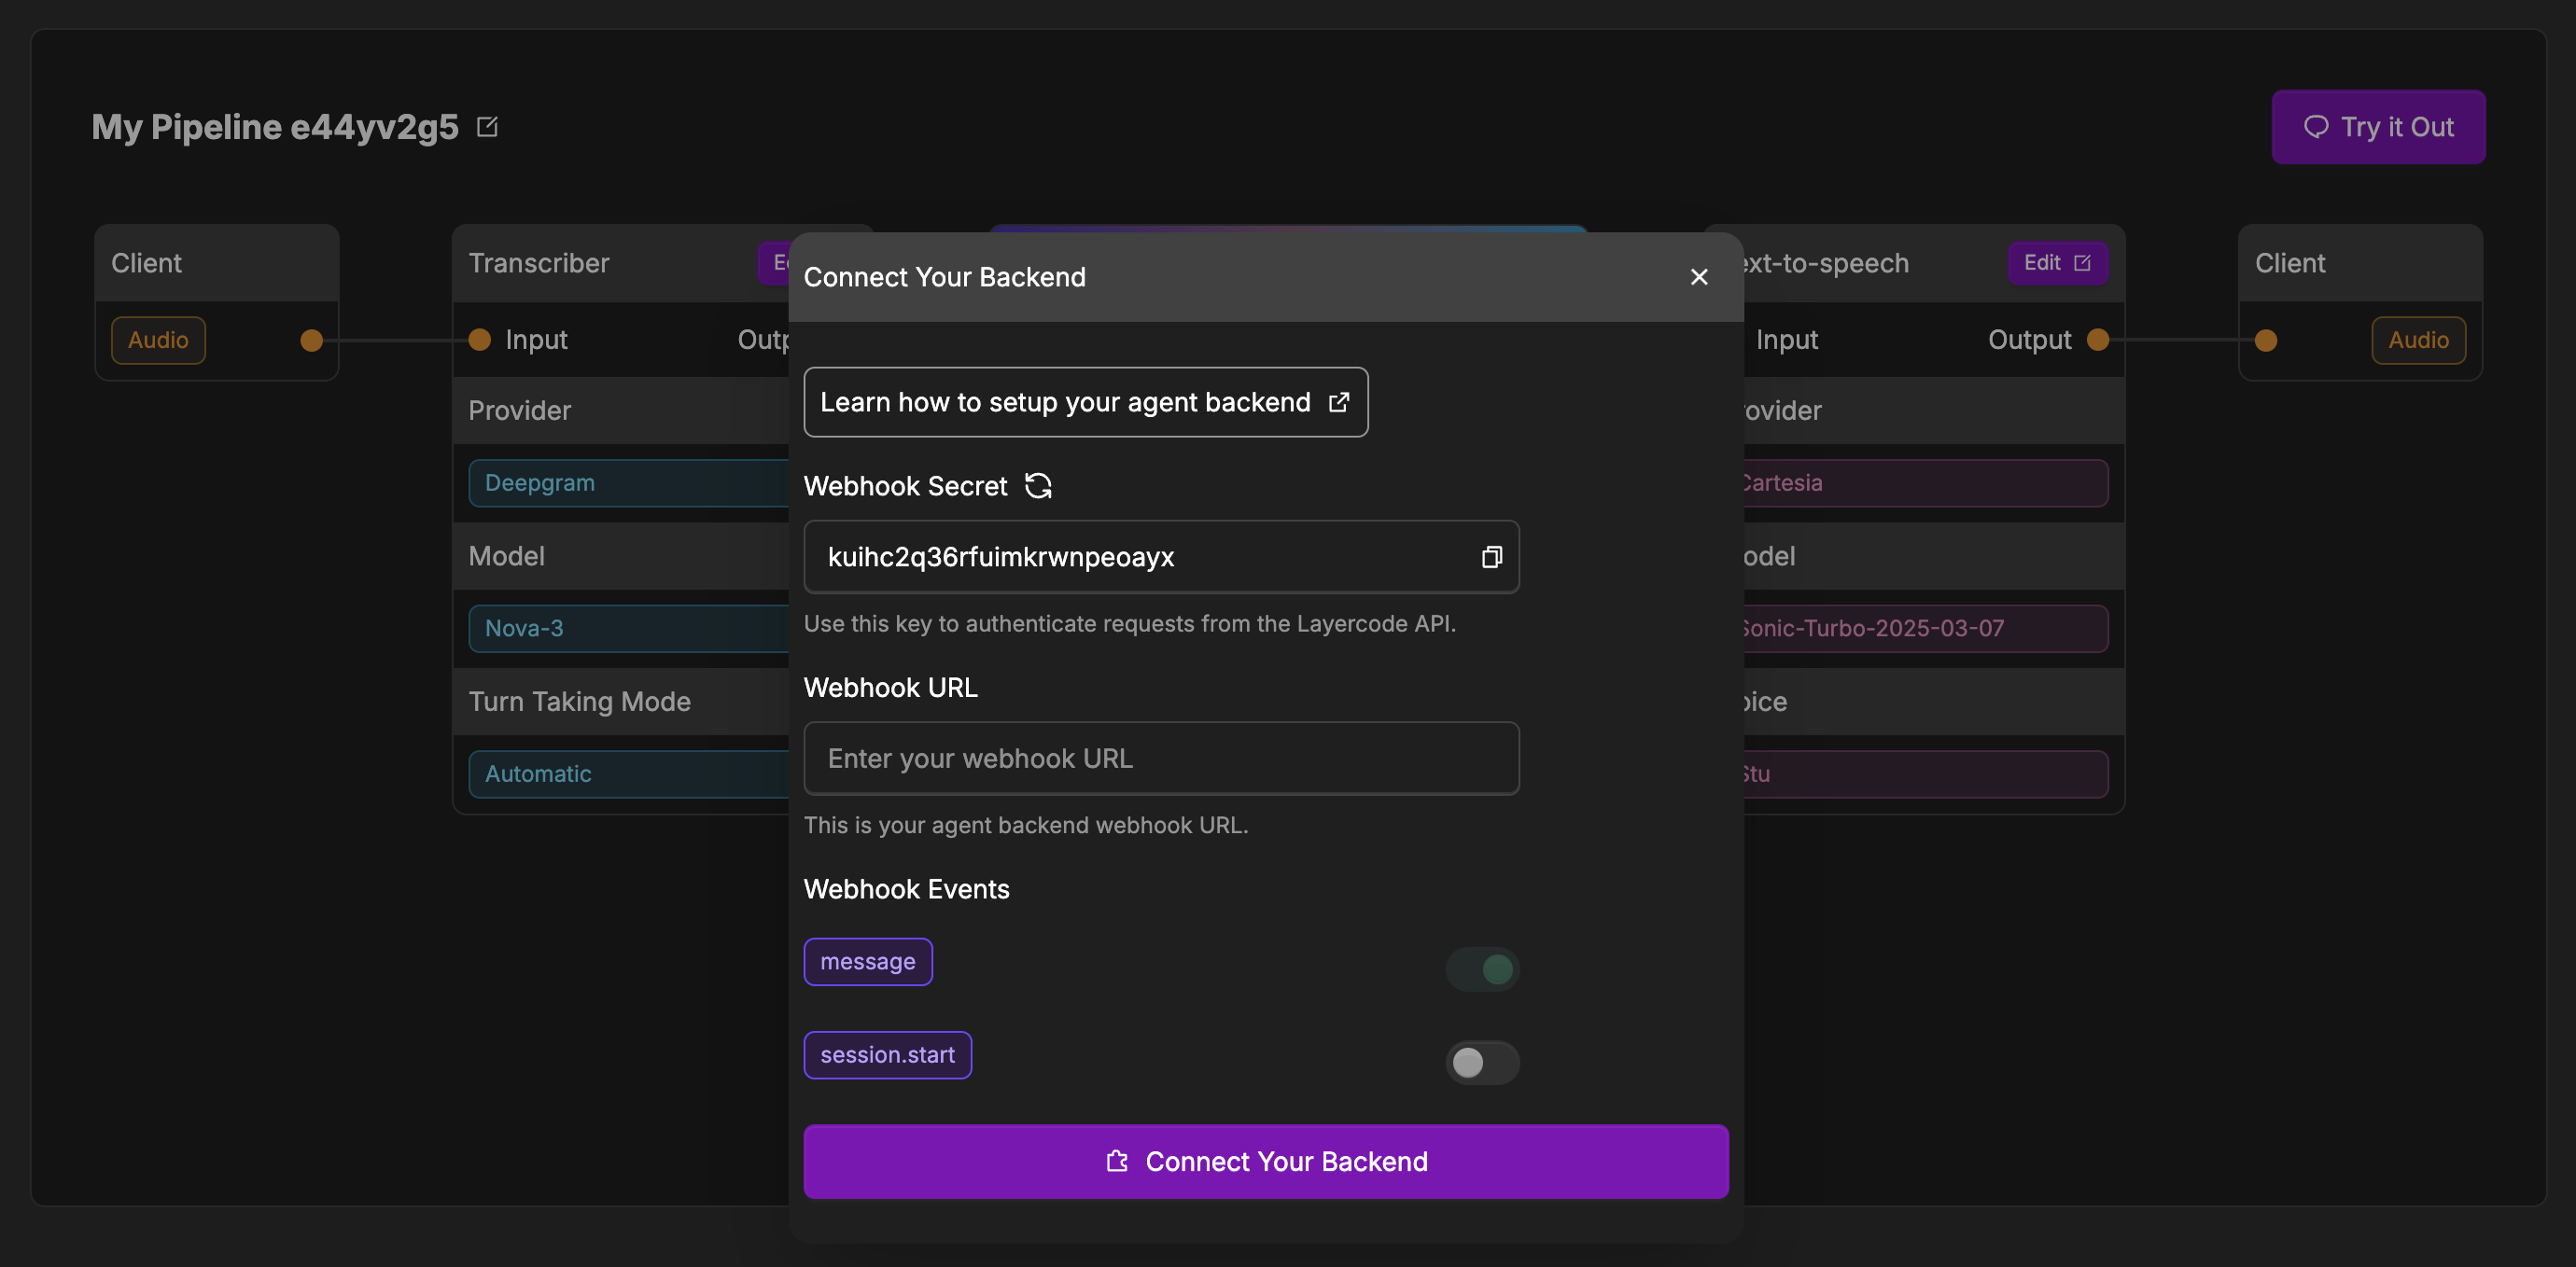
To use your own backend, click the "Connect Your Backend" button on your agent, and then set the **Webhook URL** to point to your backend's endpoint.
 When a user interacts with your voice agent, Layercode will:
1. Transcribe the user's speech to text.
2. Send an HTTP POST request to your backend at the Webhook URL you provide.
3. Your backend responds with a Server-Sent Events (SSE) stream containing the agent's reply (text to be spoken, and optional data).
4. Layercode handles converting the text in your response to speech and streaming it back to the user in real time.
5. Return of JSON data is also supported to allow you to pass state back to your UI.
When a user interacts with your voice agent, Layercode will:
1. Transcribe the user's speech to text.
2. Send an HTTP POST request to your backend at the Webhook URL you provide.
3. Your backend responds with a Server-Sent Events (SSE) stream containing the agent's reply (text to be spoken, and optional data).
4. Layercode handles converting the text in your response to speech and streaming it back to the user in real time.
5. Return of JSON data is also supported to allow you to pass state back to your UI.
 ## Configuring Your Agent
1. In the Layercode dashboard, open your agent and click **Connect Your Backend** (or click the edit button in the Your Backend box if you've already connected your backend previously).
2. Enter your backend's **Webhook URL** in the configuration modal.
3. Optionally, configure which agent events you want to receive and (if needed) set a session webhook for lifecycle events (see below).
4. Save your changes.
## Agent Webhook Events
* **message** (required):\
Sent when the user finishes speaking. Contains the transcribed message and metadata. Your backend should respond with an SSE stream containing the agent's reply.
* **data** (optional):
Fired when your client calls `response.data` (e.g. HTMX forms, function invocations). Useful for reacting to structured payloads without speech.
* **welcome** (optional):\
Sent as soon as a session opens so your agent can greet the user proactively. If disabled, the agent waits for the user to speak first.
## Session Webhook Events
Configure the optional session webhook to receive lifecycle callbacks separate from agent responses:
* **session.start** – Fired when a session is authorized. Includes metadata, phone numbers, and IDs.
* **session.end** – Delivered after the bridge closes along with duration, transcript history, and latency metrics.
* **session.update** – Fired when recordings finish processing (e.g. transcription uploads). Requires session recording to be enabled for the org.
## Webhook Verification
To ensure the security of your backend, it's crucial to verify that incoming requests are indeed from Layercode. This can be done by verifying the `layercode-signature` header, which contains a timestamp and a HMAC-SHA256 signature of the request body.
Here's how you can verify the signature in your backend:
1. Retrieve the `layercode-signature` header from the request. It will be in the format: `t=timestamp,v1=signature`.
2. Get your Layercode webhook secret from the Layercode dashboard (found by going to the appropriate agent and clicking the edit button in the Your Backend box, where you'll find the Webhook Secret).
3. Reconstruct the signed payload by concatenating the timestamp, a period (`.`), and the exact raw webhook request body: `signed_payload = timestamp + "." + request_body`.
4. Compute the HMAC-SHA256 signature of this signed payload using your webhook secret.
5. Compare the computed signature with the `v1` value from the `layercode-signature` header. If they match, the request is valid.
6. (Recommended) Check that the timestamp is recent (for example, within 5 minutes) to prevent replay attacks.
## Example: Webhook Request
When a user finishes speaking, Layercode will send a POST request to your webhook with the following JSON payload body:
```json theme={null}
{
"type": "message", // Agent events: message, data, welcome
"session_id": "uuid", // Session ID is unique per conversation. Use this to know which conversation a webhook belongs to.
"turn_id": "uuid", // Turn ID is unique per turn of the conversation. This ID must be returned in all SSE events. It is unique per turn of the conversation.
"text": "What's the weather today?" // The user's transcribed message
}
```
See the [Webhook SSE API documentation](/api-reference/webhook-sse-api) for details
## Example: SSE Response
Your backend should respond with an SSE stream. Each SSE message contains a JSON payload with the following fields: `type`, `content` (when required) and `turn_id`. See the [Webhook SSE API documentation](/api-reference/webhook-sse-api) for details.
## Configuring Your Agent
1. In the Layercode dashboard, open your agent and click **Connect Your Backend** (or click the edit button in the Your Backend box if you've already connected your backend previously).
2. Enter your backend's **Webhook URL** in the configuration modal.
3. Optionally, configure which agent events you want to receive and (if needed) set a session webhook for lifecycle events (see below).
4. Save your changes.
## Agent Webhook Events
* **message** (required):\
Sent when the user finishes speaking. Contains the transcribed message and metadata. Your backend should respond with an SSE stream containing the agent's reply.
* **data** (optional):
Fired when your client calls `response.data` (e.g. HTMX forms, function invocations). Useful for reacting to structured payloads without speech.
* **welcome** (optional):\
Sent as soon as a session opens so your agent can greet the user proactively. If disabled, the agent waits for the user to speak first.
## Session Webhook Events
Configure the optional session webhook to receive lifecycle callbacks separate from agent responses:
* **session.start** – Fired when a session is authorized. Includes metadata, phone numbers, and IDs.
* **session.end** – Delivered after the bridge closes along with duration, transcript history, and latency metrics.
* **session.update** – Fired when recordings finish processing (e.g. transcription uploads). Requires session recording to be enabled for the org.
## Webhook Verification
To ensure the security of your backend, it's crucial to verify that incoming requests are indeed from Layercode. This can be done by verifying the `layercode-signature` header, which contains a timestamp and a HMAC-SHA256 signature of the request body.
Here's how you can verify the signature in your backend:
1. Retrieve the `layercode-signature` header from the request. It will be in the format: `t=timestamp,v1=signature`.
2. Get your Layercode webhook secret from the Layercode dashboard (found by going to the appropriate agent and clicking the edit button in the Your Backend box, where you'll find the Webhook Secret).
3. Reconstruct the signed payload by concatenating the timestamp, a period (`.`), and the exact raw webhook request body: `signed_payload = timestamp + "." + request_body`.
4. Compute the HMAC-SHA256 signature of this signed payload using your webhook secret.
5. Compare the computed signature with the `v1` value from the `layercode-signature` header. If they match, the request is valid.
6. (Recommended) Check that the timestamp is recent (for example, within 5 minutes) to prevent replay attacks.
## Example: Webhook Request
When a user finishes speaking, Layercode will send a POST request to your webhook with the following JSON payload body:
```json theme={null}
{
"type": "message", // Agent events: message, data, welcome
"session_id": "uuid", // Session ID is unique per conversation. Use this to know which conversation a webhook belongs to.
"turn_id": "uuid", // Turn ID is unique per turn of the conversation. This ID must be returned in all SSE events. It is unique per turn of the conversation.
"text": "What's the weather today?" // The user's transcribed message
}
```
See the [Webhook SSE API documentation](/api-reference/webhook-sse-api) for details
## Example: SSE Response
Your backend should respond with an SSE stream. Each SSE message contains a JSON payload with the following fields: `type`, `content` (when required) and `turn_id`. See the [Webhook SSE API documentation](/api-reference/webhook-sse-api) for details.