We are rolling out a new low-latency agent integration that connects to your backend over WebSocket. Existing webhook + SSE agents continue to work, but new real-time features (like barge-in and token streaming) use the WebSocket channel instead. Until the migration is complete you can keep this webhook reference handy, and review the WebSocket agent guide (preview) inside the dashboard for the latest schema.
Receiving requests from Layercode
In order to receive and process messages from your users, you need a backend endpoint that Layercode can communicate with. For example, in Next.js it might look something like this:Tell Layercode where your endpoint is
Now you have an endpoint to receive messages from Layercode, you need to tell Layercode where to send your events. Go to Layercode’s dashboard, create or use an existing agent. Go to manual setup and type in the API endpoint that Layercode should send requests to.
Expose your local endpoint with a tunnel
If you’re developing locally, you will need to run a tunnel such as cloudflared or ngrok and paste the tunnel URL into the dashboard (with the path of your endpoint in your app appended - for example tunnel-url/api/agent). Our tunnelling guide walks through the setup.Verify incoming requests
You should make sure that only authorized requests are sent to this endpoint. To do this, we expose a secret that you can find in the same location you used above. You should save this secret with the other secrets in your backend and verify each incoming request toCustomize which events you receive
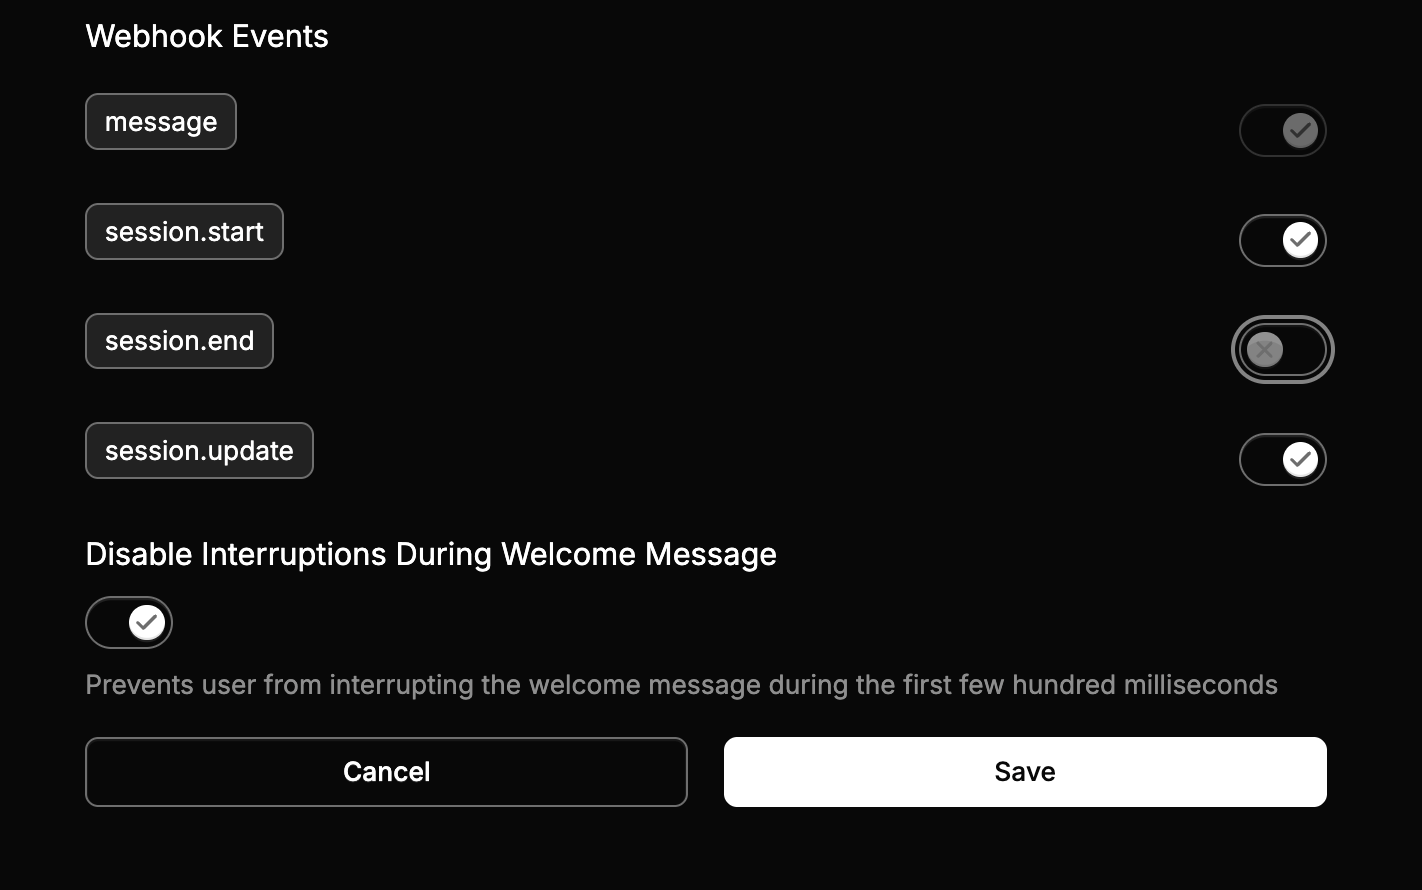
You can see details on the data that Layercode sends to this endpoint here Agent webhook events (configure inside the Your Backend modal):message– (required) Fired after speech-to-text transcription completes for the user’s turn.data– Delivered when the client sends a structured payload viaresponse.data.session.start– Sent as soon as a session opens so you can greet the user proactively.
session.end– Delivered when a session closes, including timing metrics and the full transcript.session.update– Sent asynchronously once a session recording finishes processing (requires session recording to be enabled for the org).
Attach custom metadata and headers to webhooks
Add static metadata in the pipeline builder (the value is forwarded to every agent + session webhook request). To attach per-session metadata or headers, send aconfig.session_webhook override in the Layercode REST API /v1/agents/web/authorize_session request. See custom metadata and headers how-to.
Respond to webhook events
It’s great to receive messages from users but of course you want to reply too. We can use a method on Layercode’s stream object to replyawait stream.ttsTextStream("this is my reply");